Pre-train your first model#
Overview#
Follow this guide to pre-train your first model on a Cerebras system.
This tutorial teaches you about Cerebras essentials like data preprocessing and training scripts, config files, and checkpoint conversion tools. To understand these concepts, you’ll pre-train Meta’s Llama 3 8B on 40,000 lines of Shakespeare.
In this quickstart guide, you will:
Setup your environment
Pre-process a small dataset
Pre-train and evaluate a model
Port your model to Hugging Face
Note
In this tutorial, you will train your model for a short while on a small dataset. A high quality model requires a longer training run, as well as a much larger dataset.
Prerequisites#
To begin this guide, you must have:
Cerebras system access. If you don’t have acces, contact Cerebras Support.
Completed setup and installation.
Step 1: Setup#
Set environment variables#
Start by saving common paths in environment variables for easy access, including:
The parent directory above Model Zoo
The location of data preprocessing scripts
The location of training scripts (in this case, Llama 3)
The location of scripts for converting checkpoints to Hugging Face
export MODELZOO_PARENT=$(pwd)
export MODELZOO_DATA=$MODELZOO_PARENT/modelzoo/src/cerebras/modelzoo/data_preparation/data_preprocessing
export MODELZOO_MODEL=$MODELZOO_PARENT/modelzoo/src/cerebras/modelzoo/models/nlp/llama
export MODELZOO_TOOLS=$MODELZOO_PARENT/modelzoo/src/cerebras/modelzoo/tools
export MODELZOO_COMMON=$MODELZOO_PARENT/modelzoo/src/cerebras/modelzoo/common
Create model directory#
Create a dedicated folder for assets (data/model configs) and generated files (processed data files, checkpoints, logs, etc.):
mkdir pretraining_tutorial
Copy configs#
Then, copy sample configs into your folder. You will use these to control Model Zoo scripts for efficient data preprocessing, training, and evaluation of large models.
cp modelzoo/src/cerebras/modelzoo/tutorials/pretraining/* pretraining_tutorial
Inspect data config (optional)#
Take a look at one of your data configs:
cat pretraining_tutorial/train_data_config.yaml
Here is what you should see on your terminal:
#############################################
## Pre-Training Tutorial Train Data Config ##
#############################################
setup:
    data:
        type: "huggingface"
        source: "karpathy/tiny_shakespeare"
        split: "train"
    mode: "pretraining"
    output_dir: "pretraining_tutorial/train_data"
    processes: 1

processing:
    huggingface_tokenizer: "baseten/Meta-Llama-3-tokenizer"
    write_in_batch: True
    read_hook: "cerebras.modelzoo.data_preparation.data_preprocessing.hooks:text_read_hook"
    read_hook_kwargs:
        data_keys:
            text_key: "text"

dataset:
    use_ftfy: True
This config file will process the ”train” split of the karpathy/tiny_shakespeare dataset from Hugging Face using the baseten/Meta-Llama-3-tokenizer.
An example of “train” looks as follows:
{
    "text": "First Citizen:\nBefore we proceed any further, hear me "
}
If you are interested, you can read more about the various parameters and pre-built utilities for preprocessing common data formats. You can also follow end-to-end tutorials for various use cases.
Inspect model config (optional)
Take a look at your model config:
cat pretraining_tutorial/model_config.yaml
Here’s what you should see in your terminal:
########################################
## Pre-Training Tutorial Model Config ##
########################################

trainer:
  init:
    model_dir: pretraining_tutorial/model
    backend:
      backend_type: CSX
      cluster_config:
        num_csx: 1
    callbacks:
    - ComputeNorm: {}
    checkpoint:
      steps: 18
    logging:
      log_steps: 1
    loop:
      eval_steps: 5
      max_steps: 18
    model:
      attention_dropout_rate: 0.0
      attention_module: multiquery_attention
      attention_type: scaled_dot_product
      dropout_rate: 0.0
      embedding_dropout_rate: 0.0
      embedding_layer_norm: false
      extra_attention_params:
        num_kv_groups: 8
      filter_size: 14336
      fp16_type: cbfloat16
      hidden_size: 4096
      initializer_range: 0.02
      layer_norm_epsilon: 1.0e-05
      loss_scaling: num_tokens
      loss_weight: 1.0
      max_position_embeddings: 8192
      mixed_precision: true
      nonlinearity: swiglu
      norm_type: rmsnorm
      num_heads: 32
      num_hidden_layers: 32
      pos_scaling_factor: 1.0
      position_embedding_type: rotary
      rope_theta: 500000.0
      rotary_dim: 128
      share_embedding_weights: false
      use_bias_in_output: false
      use_ffn_bias: false
      use_ffn_bias_in_attention: false
      use_projection_bias_in_attention: false
      vocab_size: 128256
    optimizer:
      AdamW:
        betas:
        - 0.9
        - 0.95
        correct_bias: true
        weight_decay: 0.01
    precision:
      enabled: true
      fp16_type: cbfloat16
      log_loss_scale: true
      loss_scaling_factor: dynamic
      max_gradient_norm: 1.0
    schedulers:
    - CosineDecayLR:
        end_learning_rate: 1.0e-05
        initial_learning_rate: 5.0e-05
        total_iters: 18
    seed: 1
  fit:
    train_dataloader:
      batch_size: 8
      data_dir: train_data
      data_processor: GptHDF5MapDataProcessor
      num_workers: 8
      persistent_workers: true
      prefetch_factor: 10
      shuffle: true
      shuffle_seed: 1337
    val_dataloader: &id001
      batch_size: 1
      data_dir: valid_data
      data_processor: GptHDF5MapDataProcessor
      num_workers: 8
      shuffle: false
  validate:
    val_dataloader: *id001
  validate_all:
    val_dataloaders: *id001
These parameters specify the full architecture of the Llama 3 8B model and help define a Trainer object for training, validation, and logging semantics.
If you are interested, learn more about model configs here, or dive into how to set up flexible training and evaluation. You can also follow end-to-end tutorials for various use cases.
Inspect evaluation config (optional)
Take a look at your evaluation config:
cat pretraining_tutorial/eeh_config.yaml
Here is what you should see in your terminal:
##############################################################
## Pre-Training Tutorial Eleuther Evaluation Harness Config ##
##############################################################
trainer:
  init:
    backend:
      backend_type: CSX
      cluster_config:
        num_csx: 1
    model:
      model_name: llama
      attention_dropout_rate: 0.0
      attention_module: multiquery_attention
      attention_type: scaled_dot_product
      dropout_rate: 0.0
      embedding_dropout_rate: 0.0
      embedding_layer_norm: false
      extra_attention_params:
        num_kv_groups: 8
      filter_size: 14336
      fp16_type: cbfloat16
      hidden_size: 4096
      initializer_range: 0.02
      layer_norm_epsilon: 1.0e-05
      loss_scaling: num_tokens
      loss_weight: 1.0
      max_position_embeddings: 8192
      mixed_precision: true
      nonlinearity: swiglu
      norm_type: rmsnorm
      num_heads: 32
      num_hidden_layers: 32
      pos_scaling_factor: 1.0
      position_embedding_type: rotary
      rope_theta: 500000.0
      rotary_dim: 128
      share_embedding_weights: false
      use_bias_in_output: false
      use_ffn_bias: false
      use_ffn_bias_in_attention: false
      use_projection_bias_in_attention: false
      vocab_size: 128256
    callbacks:
    - EleutherEvalHarness:
      eeh_args:
        tasks: winogrande
        num_fewshot: 0
      keep_data_dir: false
      batch_size: 4
      shuffle: false
      max_sequence_length: 8192
      num_workers: 1
      data_dir: pretraining_tutorial/eeh
      eos_id: 128001
      pretrained_model_name_or_path: baseten/Meta-Llama-3-tokenizer
      flags:
        csx.performance.micro_batch_size: null
This file lets you evaluate your model via the multiple choice (non-generative) eval harness task winogrande on a single CSX system.
If you are interested, you can learn more about validating models using the Eleuther or BigCode Evaluation Harness in our documentation.
Step 2: Preprocess data#
Preprocess training and validation data
Use your data configs to preprocess your “train” and “validation” datasets:
python $MODELZOO_DATA/preprocess_data.py \
  --config pretraining_tutorial/train_data_config.yaml

python $MODELZOO_DATA/preprocess_data.py \
  --config pretraining_tutorial/valid_data_config.yaml
You should then see your preprocessed data in pretraining_tutorial/train_data/ and pretraining_tutorial/valid_data/ (see the output_dir parameter in your data configs).
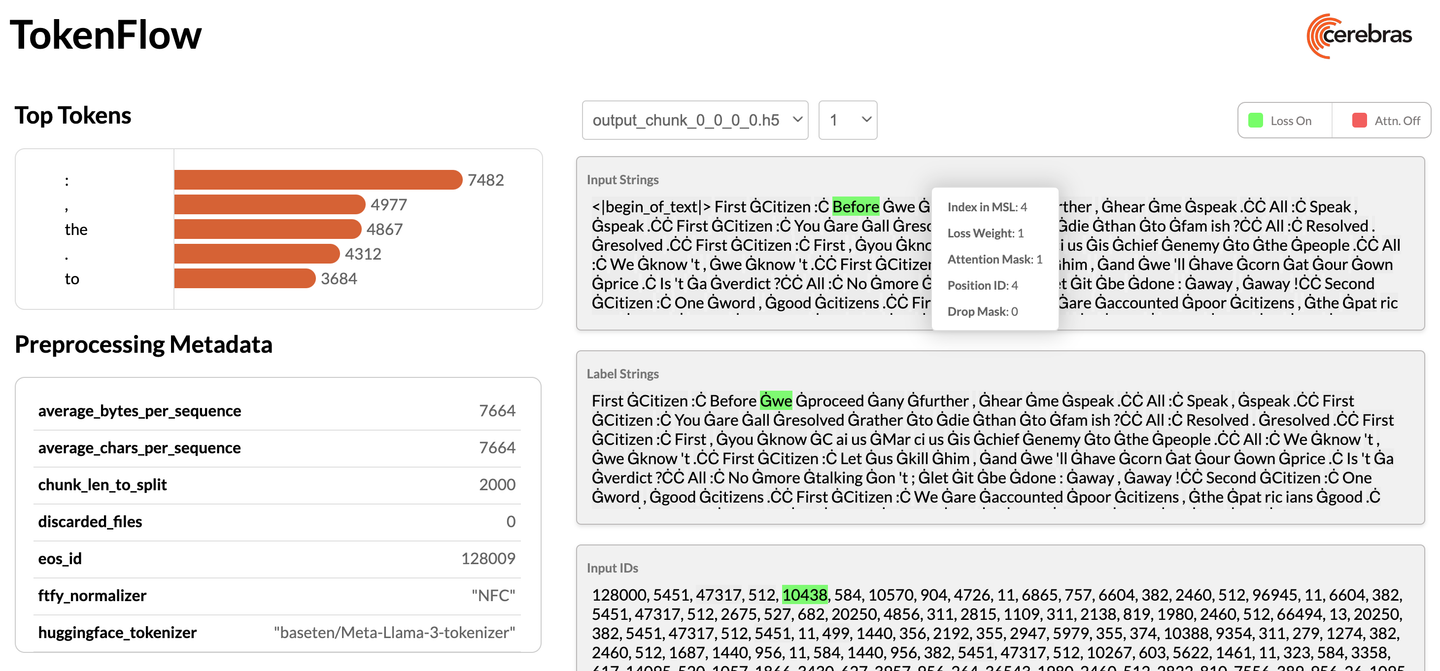
Inspect preprocessed data (optional)
Once you’ve preprocessed your data, you can visualize the outcome:
python $MODELZOO_DATA/tokenflow/launch_tokenflow.py \
  --output_dir pretraining_tutorial/train_data
In your terminal, you will see a url like http://172.31.48.239:5000. Copy and paste this into your browser to launch TokenFlow, a tool for interactively visualizing whether loss and attention masks were applied correctly:
Step 3: Train and evaluate model#
Modify configs#
Set train_dataloader.data_dir and val_dataloader.data_dir in your model config to the absolute paths of your preprocessed data:
sed -i "s|data_dir: train_data|data_dir: ${MODELZOO_PARENT}/pretraining_tutorial/train_data|" \
pretraining_tutorial/model_config.yaml

sed -i "s|data_dir: valid_data|data_dir: ${MODELZOO_PARENT}/pretraining_tutorial/valid_data|" \
pretraining_tutorial/model_config.yaml
Submit training job#
Train your model by passing your updated model configs, the location of important directories, and python packages to a run script. Click here for more information.
python $MODELZOO_MODEL/run.py CSX \
  --mode train_and_eval \
  --params pretraining_tutorial/model_config.yaml \
  --mount_dirs $MODELZOO_PARENT $MODELZOO_PARENT/modelzoo \
  --python_paths $MODELZOO_PARENT/modelzoo/src \
You should then see something like this in your terminal:
Transferring weights to server: 100%|██| 1165/1165 [01:00<00:00, 19.33tensors/s]
INFO:   Finished sending initial weights
INFO:   | Train Device=CSX, Step=50, Loss=8.31250, Rate=69.37 samples/sec, GlobalRate=69.37 samples/sec
INFO:   | Train Device=CSX, Step=100, Loss=7.25000, Rate=68.41 samples/sec, GlobalRate=68.56 samples/sec
...
Once training is complete, you will find several artifacts in the pretraining_tutorial/model folder (see the model_dir parameter in your model config). These include:
Checkpoints
TensorBoard event files
Run logs
A copy of the model config
Inspect training logs (optional)#
Monitor your training during the run or visualize TensorBoard event files afterwards:
tensorboard --bind_all --logdir="pretraining_tutorial/model"
Step 4: Port model to Hugging Face#
Convert checkpoint and configs#
Once you train (and evaluate) your model, you can port it to Hugging Face to generate outputs:
python $MODELZOO_TOOLS/convert_checkpoint.py \
  convert \
  --model llama \
  --src-fmt cs-auto \
  --tgt-fmt hf \
  --config pretraining_tutorial/model_config.yaml \
  --output-dir pretraining_tutorial/to_hf \
  pretraining_tutorial/model/checkpoint_0.mdl
This will create both Hugging Face config files and a converted checkpoint under pretraining_tutorial/to_hf.
Validate checkpoint and configs (optional)#
You can now generate outputs using Hugging Face:
pip install 'transformers[torch]'
python
Python 3.8.16 (default, Mar 18 2024, 18:27:40)
[GCC 8.4.0] on linux
Type "help", "copyright", "credits" or "license" for more information.

>>> from transformers import AutoTokenizer, AutoModelForCausalLM, AutoConfig

>>> from transformers import pipeline

>>> tokenizer = AutoTokenizer.from_pretrained("baseten/Meta-Llama-3-tokenizer")

>>> config = AutoConfig.from_pretrained("pretraining_tutorial/to_hf/model_config_to_hf.json")

>>> model = AutoModelForCausalLM.from_pretrained(pretrained_model_name_or_path="pretraining_tutorial/to_hf/checkpoint_0_to_hf.bin", config = config)

>>> text = "Generative AI is "

>>> pipe = pipeline("text-generation", model=model, tokenizer=tokenizer)

>>> generated_text = pipe(text, max_length=50, do_sample=False, no_repeat_ngram_size=2, eos_token_id=pipeline.tokenizer.eos_token_id, pad_token_id=pipeline.tokenizer.eos_token_id)[0]

>>> print(generated_text['generated_text'])

>>> exit()
Note
As a reminder, in this quickstart, you did not train your model for very long. A high quality model requires a longer training run, as well as a much larger dataset.
Conclusion#
Congratulations! In this tutorial, you followed an end-to-end workflow to pre-train a model on a Cerebras system and learn about essential tools and scripts.
As part of this, your learned how to:
Setup your environment
Pre-process a small dataset
Pre-train and evaluate a model
Port your model to Hugging Face
What’s next?#
Learn how to fine-tune your first model.
Learn more about data preprocessing.
Learn more about the Cerebras Model Zoo and the different models we support.