Pretraining with Upstream Validation#
On this page, you’ll learn how to configure and execute a pre-training run with some upstream validation. More specifically you’ll be pre-training a LLaMA3 8B model here as an example.
By the end, you should be comfortable kicking off your own pre-training run for the model of your choice.
Prerequisites#
Please ensure that you have installed the Cerebras Model Zoo package by going through the installation guide.
Make sure to have read through Trainer Overview and Trainer Configuration Overview which provide the basic overview of how to run Model Zoo models. In this document, you will be using the tools and configurations outlined in those pages.
Configuring the Run#
This page will cover the two main flows you can employ to perform pre-training. One using a YAML configuration file and a training script that is packaged in the Cerebras ModelZoo. The other using pure Python to run on your own. They will be presented side-by-side so that you can compare the two flows as you progress through this tutorial.
If you aren’t interested in seeing the break down of the configuration, you can skip ahead to the Putting It All Together section to see the full configuration.
Configure the Wafer-Scale Cluster#
Let’s first figure out how much resources you’ll want to use for this pre-training job.
In this example, let’s use a 16 node Wafer-Scale Cluster. To configure this, you can specify the number of Cerebras systems to use.
trainer:
  init:
    backend:
      backend_type: CSX
      cluster_config:
        num_csx: 16
import cerebras.pytorch as cstorch
from cerebras.modelzoo import Trainer

trainer = Trainer(
    backend=cstorch.backend(
        backend_type="CSX",
        cluster_config=cstorch.distributed.ClusterConfig(
            num_csx=16,
        ),
    ),
    ...,
)
...
Notice how you can change cluster configuration parameters like num_csx
to scale the run without making any changes to the model itself.
Configure the Model#
Here you will be pre-training the LLaMA3 model class that comes packaged inside of the Cerebras ModelZoo.
The LLaMA3 model by default will compute the accuracy and perplexity metrics during upstream validation.
To configure the LLaMA3 8B model, you specify the following parameters to the model key.
trainer:
  init:
    backend:  # CSX
      ...
    model:
      # Embedding
      vocab_size: 128256
      hidden_size: 4096
      position_embedding_type: "rotary"
      pos_scaling_factor: 1.0
      rope_theta: 500000.0
      rotary_dim: 128
      share_embedding_weights: false
      max_position_embeddings: 8192
      embedding_dropout_rate: 0.0
      embedding_layer_norm: false

      # Decoder
      num_hidden_layers: 32
      dropout_rate: 0.0
      layer_norm_epsilon: 1.0e-5
      norm_type: "rmsnorm"

      # Decoder - Attention
      num_heads: 32
      attention_type: "scaled_dot_product"
      attention_module: "multiquery_attention"
      attention_dropout_rate: 0.0
      use_projection_bias_in_attention: false
      use_ffn_bias_in_attention: false
      extra_attention_params:
          num_kv_groups: 8

      # Decoder - ffn
      filter_size: 14336
      nonlinearity: "swiglu"
      use_ffn_bias: false

      # Task-specific
      use_bias_in_output: false
      loss_scaling: "num_tokens"
      loss_weight: 1.0

      # Initializer
      initializer_range: 0.02

      # Cerebras parameters
      mixed_precision: True
      fp16_type: "cbfloat16"
    ...
To configure the LLaMA3 8B model, you construct the model inside a lambda to take advantage of the Trainer’s efficient weight initialization feature.
import cerebras.pytorch as cstorch
from cerebras.modelzoo import Trainer
from cerebras.modelzoo.models.nlp.gpt2.model import Gpt2Model as LLaMA3

trainer = Trainer(
    backend=cstorch.backend("CSX", ...),
    model=lambda: LLaMA3(
        # Embedding
        vocab_size=128256,
        hidden_size=4096,
        position_embedding_type="rotary",
        pos_scaling_factor=1.0,
        rope_theta=500000.0,
        rotary_dim=128,
        share_embedding_weights=False,
        max_position_embeddings=8192,
        embedding_dropout_rate=0.0,
        embedding_layer_norm=False,

        # Decoder
        num_hidden_layers=32,
        dropout_rate=0.0,
        layer_norm_epsilon=1.0e-5,
        norm_type="rmsnorm",

        # Decoder - Attention
        num_heads=32,
        attention_type="scaled_dot_product",
        attention_module="multiquery_attention",
        attention_dropout_rate=0.0,
        use_projection_bias_in_attention=False,
        use_ffn_bias_in_attention=False,
        extra_attention_params=dict(
            num_kv_groups=8,
        ),

        # Decoder - ffn
        filter_size=14336,
        nonlinearity="swiglu",
        use_ffn_bias=False,

        # Task-specific
        use_bias_in_output=False,
        loss_scaling="num_tokens",
        loss_weight=1.0,

        # Initializer
        initializer_range=0.02,

        # Cerebras parameters
        mixed_precision=True,
        fp16_type="cbfloat16",
    ),
    ...,
)
...
Note
LLaMA3 is just a configuration of GPT2, hence why you are importing
and initializing a Gpt2Model class.
Configure the Optimizer#
Here you will be using the AdamW optimizer
to optimize our model during pre-training.
To configure the AdamW optimizer, you
specify the following parameters to the
optimizer key.
trainer:
  init:
    backend:  # CSX
      ...
    model:  # llama
      ...
    optimizer:
      AdamW:
        betas: [0.9, 0.95]
        correct_bias: True
        weight_decay: 0.1
Note, you don’t specify a learning rate here as you will configure a learning rate scheduler, just below.
To configure the AdamW optimizer,
you can construct it as follows.
import cerebras.pytorch as cstorch
from cerebras.modelzoo import Trainer
from cerebras.modelzoo.models.nlp.gpt2.model import Gpt2Model as LLaMA3

trainer = Trainer(
    backend=cstorch.backend("CSX", ...),
    model=lambda: LLaMA3(...),
    optimizer=lambda model: cstorch.optim.AdamW(
        model.parameters(),
        lr=0.01,  # This is a placeholder
        betas=[0.9, 0.95],
        correct_bias=True,
        weight_decay: 0.1,
    ),
    ...,
)
...
Note, you specified a placeholder learning rate of 0.01 here as you
will configure a learning rate scheduler, just below.
Configure a Learning Rate Scheduler#
Here you will be using a CosineDecayLR
learning rate scheduler.
To configure the CosineDecayLR
learning rate scheduler, you specify the following parameters to the
schedulers key.
trainer:
  init:
    backend:  # CSX
      ...
    model:  # llama
      ...
    optimizer:  # AdamW
      ...
    schedulers:
    - CosineDecayLR:
        initial_learning_rate: 3.0e-5
        end_learning_rate: 3.0e-6
        total_iters: 528
To configure the CosineDecayLR
learning rate scheduler, you can construct it as follows.
import cerebras.pytorch as cstorch
from cerebras.modelzoo import Trainer
from cerebras.modelzoo.models.nlp.gpt2.model import Gpt2Model as LLaMA3

trainer = Trainer(
    backend=cstorch.backend("CSX", ...),
    model=lambda: LLaMA3(...),
    optimizer=lambda model: cstorch.optim.AdamW(...),
    schedulers=[
        lambda optimizer: cstorch.optim.lr_scheduler.CosineDecayLR(
            initial_learning_rate=3.0e-5,
            end_learning_rate=3.0e-6,
            total_iters=528,
        ),
    ],
    ...,
)
...
Configure Mixed Precision and Gradient Scaling#
To get better performance, let’s use mixed precision in the run. More
specifically, let’s configure the cluster to use cbfloat16 as the lower
precision type (see CB16 Half-Precision for more details on the cbfloat16
data format).
Since a lower precision is being used for activations, you’ll want to scale the gradients to prevent underflowing. Let’s use dynamic loss scaling for this run.
In addition, to prevent gradients from exploding, let’s also clip the gradients based on its norm.
To configure the precision type and gradient scaling, you can specify the following parameters to the precision key.
trainer:
  init:
    backend:  # CSX
      ...
    model:  # llama
      ...
    optimizer:  # AdamW
      ...
    schedulers:  # CosineDecayLR
      ...
    precision:
      fp16_type: cbfloat16
      loss_scaling_factor: dynamic
      max_gradient_norm: 1.0
To configure the precision type and gradient scaling, you can construct a
MixedPrecision object
as follows.
import cerebras.pytorch as cstorch
from cerebras.modelzoo import Trainer
from cerebras.modelzoo.trainer.callbacks import MixedPrecision
from cerebras.modelzoo.models.nlp.gpt2.model import Gpt2Model as LLaMA3

trainer = Trainer(
    backend=cstorch.backend("CSX", ...),
    model=lambda: LLaMA3(...),
    optimizer=lambda model: cstorch.optim.AdamW(...),
    schedulers=[...],
    precision=MixedPrecision(
        fp16_type="cbfloat16",
        loss_scaling_factor="dynamic",
        max_gradient_norm=1.0,
    ),
    ...,
)
...
Configure the Training/Validation Loop#
For this tutorial, let’s pre-train the model for 10k steps and run validation every 1k steps.
To configure the number of training and validation steps you can specify the following parameters to the loop key.
trainer:
  init:
    backend:  # CSX
      ...
    model:  # llama
      ...
    optimizer:  # AdamW
      ...
    schedulers:  # CosineDecayLR
      ...
    precision:  # DLS
      ...
    loop:
      num_steps: 10000
      eval_frequency: 1000
      eval_steps: 1000
To configure the number of training and validation steps, you can
construct a
TrainingLoop object as
follows.
import cerebras.pytorch as cstorch
from cerebras.modelzoo import Trainer
from cerebras.modelzoo.trainer.callbacks import MixedPrecision, TrainingLoop
from cerebras.modelzoo.models.nlp.gpt2.model import Gpt2Model as LLaMA3

trainer = Trainer(
    backend=cstorch.backend("CSX", ...),
    model=lambda: LLaMA3(...),
    optimizer=lambda model: cstorch.optim.AdamW(...),
    schedulers=[...],
    precision=MixedPrecision(...),
    loop=TrainingLoop(
      num_steps=10000,
      eval_frequency=1000,
      eval_steps=1000,
    ),
    ...,
)
...
Configure Checkpointing#
In case you want to restart training from some point in the middle with different hyperparameters, let’s save a checkpoint every 1000 steps of training. This conveniently lines up nicely with the validation frequency you specified above so that you’ll know how well the model was performing at each checkpoint.
To configure how often checkpoints are taken, you specify the following parameters to the checkpoint key.
trainer:
  init:
    backend:  # CSX
      ...
    model:  # llama
      ...
    optimizer:  # AdamW
      ...
    schedulers:  # CosineDecayLR
      ...
    precision:  # DLS
      ...
    loop:
      ...
    checkpoint:
      steps: 1000
To configure how often checkpoints are taken, you can
construct a
Checkpoint object as
follows.
import cerebras.pytorch as cstorch
from cerebras.modelzoo import Trainer
from cerebras.modelzoo.trainer.callbacks import (
    Checkpoint,
    MixedPrecision,
    TrainingLoop,
)
from cerebras.modelzoo.models.nlp.gpt2.model import Gpt2Model as LLaMA3

trainer = Trainer(
    backend=cstorch.backend("CSX", ...),
    model=lambda: LLaMA3(...),
    optimizer=lambda model: cstorch.optim.AdamW(...),
    schedulers=[...],
    precision=MixedPrecision(...),
    loop=TrainingLoop(...),
    checkpoint=Checkpoint(steps=1000),
    ...,
)
...
Configure Callbacks#
The following steps are completely optional.
For this pre-training run, let’s keep track of the gradient norms to make sure that the model numerics are stable.
In addition, let’s ensure that the loss values that the model is outputting are
valid (i.e. not NaN or inf).
Finally, since upstream validation is being run, let’s make sure that the validation metrics that are computed are being logged.
To configure these checks, you can specify the following callbacks to the callbacks key.
trainer:
  init:
    backend:  # CSX
      ...
    model:  # llama
      ...
    optimizer:  # AdamW
      ...
    schedulers:  # CosineDecayLR
      ...
    precision:  # DLS
      ...
    loop:
      ...
    checkpoint:
      ...
    callbacks:
    - ComputeNorm: {}
    - CheckLoss: {}
    - ModelEvalMetrics: {}
To configure these checks, you can construct the following callbacks and pass them to the trainer.
import cerebras.pytorch as cstorch
from cerebras.modelzoo import Trainer
from cerebras.modelzoo.trainer.callbacks import (
    CheckLoss,
    Checkpoint,
    ComputeNorm,
    MixedPrecision,
    ModelEvalMetrics,
    TrainingLoop,
)
from cerebras.modelzoo.models.nlp.gpt2.model import Gpt2Model as LLaMA3


trainer = Trainer(
    backend=cstorch.backend("CSX", ...),
    model=lambda: LLaMA3(...),
    optimizer=lambda model: cstorch.optim.AdamW(...),
    schedulers=[...],
    precision=MixedPrecision(...),
    loop=TrainingLoop(...),
    checkpoint=Checkpoint(...),
    callbacks=[
        ComputeNorm(),
        CheckLoss(),
        ModelEvalMetrics(),
    ],
)

...
Configure Loggers#
To keep track of the progress of our run, let’s also employ the use of the progress logger as well as the TensorBoard logger.
To configure these loggers, you can specify the following to the loggers key.
trainer:
  init:
    backend:  # CSX
      ...
    model:  # llama
      ...
    optimizer:  # AdamW
      ...
    schedulers:  # CosineDecayLR
      ...
    precision:  # DLS
      ...
    loop:
      ...
    checkpoint:
      ...
    callbacks:
      ...
    loggers:
    - ProgressLogger: {}
    - TensorBoardLogger: {}
To configure these loggers, you can construct the following and pass them to the trainer.
import cerebras.pytorch as cstorch
from cerebras.modelzoo import Trainer
from cerebras.modelzoo.trainer.callbacks import (
    Checkpoint,
    MixedPrecision,
    TrainingLoop,
)
from cerebras.modelzoo.trainer.loggers import (
      ProgessLogger,
      TensorBoardLogger,
)
from cerebras.modelzoo.models.nlp.gpt2.model import Gpt2Model as LLaMA3


trainer = Trainer(
    backend=cstorch.backend("CSX", ...),
    model=lambda: LLaMA3(...),
    optimizer=lambda model: cstorch.optim.AdamW(...),
    schedulers=[...],
    precision=MixedPrecision(...),
    loop=TrainingLoop(...),
    checkpoint=Checkpoint(...),
    callbacks=[...],
    loggers=[
        ProgessLogger(),
        TensorBoardLogger(),
    ],
)

...
Reproducibility#
In order to make the pre-training run reproducible, you must set the Trainer’s seed.
You can do this by specifying the seed key.
trainer:
  init:
    backend:  # CSX
      ...
    model:  # llama
      ...
    optimizer:  # AdamW
      ...
    schedulers:  # CosineDecayLR
      ...
    precision:  # DLS
      ...
    loop:
      ...
    checkpoint:
      ...
    callbacks:
      ...
    loggers:
      ...
    seed: 2024
    ...
You can do this by specifying the seed argument to the Trainer’s constructor as follows.
import cerebras.pytorch as cstorch
from cerebras.modelzoo import Trainer
from cerebras.modelzoo.trainer.callbacks import (
    Checkpoint,
    MixedPrecision,
    TrainingLoop,
)
from cerebras.modelzoo.trainer.loggers import (
      ProgessLogger,
      TensorBoardLogger,
)
from cerebras.modelzoo.models.nlp.gpt2.model import Gpt2Model as LLaMA3


trainer = Trainer(
    backend=cstorch.backend("CSX", ...),
    model=lambda: LLaMA3(...),
    optimizer=lambda model: cstorch.optim.AdamW(...),
    schedulers=[...],
    precision=MixedPrecision(...),
    loop=TrainingLoop(...),
    checkpoint=Checkpoint(...),
    callbacks=[...],
    loggers=[...],
    seed=2024,
)
...
Note
Setting different seeds across different runs of the same model may cause multiple compiles.
Configuring the DataLoaders#
Now that you’ve constructed the Trainer object, you’re almost ready to
start the pre-training run.
One of the only things left to do is to configure the training and validation dataloaders you’ll be using.
To configure the training and validation dataloaders, you can specify the following to the train_dataloader and val_dataloader keys under the fit key.
trainer:
  init:
    ...
  fit:
    train_dataloader:
      data_processor: GptHDF5MapDataProcessor
      data_dir: "/data/llama_v3_dataset_vocab128256/train"
      batch_size: 80
      shuffle: False
      shuffle_seed: 1337
      num_workers: 8
      prefetch_factor: 10
      persistent_workers: True # Important to avoid seeding at each epoch
    val_dataloader:
    - data_processor: GptHDF5MapDataProcessor
      data_dir: "/data/llama_v3_dataset_vocab128256/val"
      batch_size: 80
      shuffle: False
      shuffle_seed: 1337
      num_workers: 8
      prefetch_factor: 10
      persistent_workers: True # Important to avoid seeding at each epoch
To configure the training and validation dataloaders, you can construct
DataLoader objects and pass
them into the Trainer’s fit
method as follows.
import cerebras.pytorch as cstorch
from cerebras.modelzoo import Trainer

trainer = Trainer(...)
trainer.fit(
    train_dataloader=cstorch.utils.data.DataLoader(
        registry.get_data_processor("GptHDF5MapDataProcessor"),
        data_dir="/data/llama_v3_dataset_vocab128256/train",
        batch_size=80,
        shuffle=False,
        shuffle_seed=1337,
        num_workers=8,
        prefetch_factor=10,
        persistent_workers=True, # Important to avoid seeding at each epoch
    ),
    val_dataloader=[
        cstorch.utils.data.DataLoader(
            registry.get_data_processor("GptHDF5MapDataProcessor"),
            data_dir="/data/llama_v3_dataset_vocab128256/val",
            batch_size=80,
            shuffle=False,
            shuffle_seed=1337,
            num_workers=8,
            prefetch_factor=10,
            persistent_workers=True, # Important to avoid seeding at each epoch
        ),
    ]
)
As can be seen, the specification of the training and validation dataloaders are very similar. The only difference is that you have the option of specifying multiple validation dataloaders to run validation over multiple datasets.
Note
Please make sure to change the data_dir arguments to point to the actual
directories containing the data.
Putting It All Together#
That is all there is to configuring the pre-training run!
Let’s take a moment to step back and look at the full configuration that you’ve put together thus far.
trainer:
  init:
    backend:
      backend_type: CSX
      cluster_config:
        num_csx: 16
    seed: 2024
    model:
      # Embedding
      vocab_size: 128256
      hidden_size: 4096
      position_embedding_type: "rotary"
      pos_scaling_factor: 1.0
      rope_theta: 500000.0
      rotary_dim: 128
      share_embedding_weights: false
      max_position_embeddings: 8192
      embedding_dropout_rate: 0.0
      embedding_layer_norm: false

      # Decoder
      num_hidden_layers: 32
      dropout_rate: 0.0
      layer_norm_epsilon: 1.0e-5
      norm_type: "rmsnorm"

      # Decoder - Attention
      num_heads: 32
      attention_type: "scaled_dot_product"
      attention_module: "multiquery_attention"
      attention_dropout_rate: 0.0
      use_projection_bias_in_attention: false
      use_ffn_bias_in_attention: false
      extra_attention_params:
          num_kv_groups: 8

      # Decoder - ffn
      filter_size: 14336
      nonlinearity: "swiglu"
      use_ffn_bias: false

      # Task-specific
      use_bias_in_output: false
      loss_scaling: "num_tokens"
      loss_weight: 1.0

      # Initializer
      initializer_range: 0.02

      # Cerebras parameters
      mixed_precision: True
      fp16_type: "cbfloat16"

    optimizer:
      AdamW:
        betas: [0.9, 0.95]
        correct_bias: True
        weight_decay: 0.1

    schedulers:
    - CosineDecayLR:
        initial_learning_rate: 3.0e-5
        end_learning_rate: 3.0e-6
        total_iters: 528

    precision:
      fp16_type: cbfloat16
      loss_scaling_factor: dynamic
      max_gradient_norm: 1.0

    loop:
      num_steps: 10000
      eval_frequency: 1000
      eval_steps: 1000

    checkpoint:
      steps: 1000

    callbacks:
    - ComputeNorm: {}
    - CheckLoss: {}
    - ModelEvalMetrics: {}

    loggers:
    - ProgressLogger: {}
    - TensorBoardLogger: {}
  fit:
    train_dataloader:
      data_processor: GptHDF5MapDataProcessor
      data_dir: "/data/llama_v3_dataset_vocab128256/train"
      batch_size: 80
      shuffle: False
      shuffle_seed: 1337
      num_workers: 8
      prefetch_factor: 10
      persistent_workers: True # Important to avoid seeding at each epoch
    val_dataloader:
    - data_processor: GptHDF5MapDataProcessor
      data_dir: "/data/llama_v3_dataset_vocab128256/val"
      batch_size: 80
      shuffle: False
      shuffle_seed: 1337
      num_workers: 8
      prefetch_factor: 10
      persistent_workers: True # Important to avoid seeding at each epoch
import cerebras.pytorch as cstorch
from cerebras.modelzoo import Trainer
from cerebras.modelzoo.trainer.callbacks import (
    CheckLoss,
    Checkpoint,
    ComputeNorm,
    MixedPrecision,
    ModelEvalMetrics,
    TrainingLoop,
)
from cerebras.modelzoo.trainer.loggers import (
      ProgessLogger,
      TensorBoardLogger,
)
from cerebras.modelzoo.models.nlp.gpt2.model import Gpt2Model as LLaMA3


trainer = Trainer(
    backend=cstorch.backend(
        backend_type="CSX",
        cluster_config=cstorch.distributed.ClusterConfig(
            num_csx=16,
        ),
    ),
    seed=2024,
    model=lambda: LLaMA3(
        # Embedding
        vocab_size=128256,
        hidden_size=4096,
        position_embedding_type="rotary",
        pos_scaling_factor=1.0,
        rope_theta=500000.0,
        rotary_dim=128,
        share_embedding_weights=False,
        max_position_embeddings=8192,
        embedding_dropout_rate=0.0,
        embedding_layer_norm=False,

        # Decoder
        num_hidden_layers=32,
        dropout_rate=0.0,
        layer_norm_epsilon=1.0e-5,
        norm_type="rmsnorm",

        # Decoder - Attention
        num_heads=32,
        attention_type="scaled_dot_product",
        attention_module="multiquery_attention",
        attention_dropout_rate=0.0,
        use_projection_bias_in_attention=False,
        use_ffn_bias_in_attention=False,
        extra_attention_params=dict(
            num_kv_groups=8,
        ),

        # Decoder - ffn
        filter_size=14336,
        nonlinearity="swiglu",
        use_ffn_bias=False,

        # Task-specific
        use_bias_in_output=False,
        loss_scaling="num_tokens",
        loss_weight=1.0,

        # Initializer
        initializer_range=0.02,

        # Cerebras parameters
        mixed_precision=True,
        fp16_type="cbfloat16",
    ),
    optimizer=lambda model: cstorch.optim.AdamW(
        model.parameters(),
        lr=0.01,  # This is a placeholder
        betas=[0.9, 0.95],
        correct_bias=True,
        weight_decay: 0.1,
    ),
    schedulers=[
        lambda optimizer: cstorch.optim.lr_scheduler.CosineDecayLR(
            initial_learning_rate=3.0e-5,
            end_learning_rate=3.0e-6,
            total_iters=528,
        )
    ],
    precision=MixedPrecision(
        fp16_type="cbfloat16",
        loss_scaling_factor="dynamic",
        max_gradient_norm=1.0,
    ),
    loop=TrainingLoop(
      num_steps=10000,
      eval_frequency=1000,
      eval_steps=1000,
    ),
    checkpoint=Checkpoint(steps=1000),
    callbacks=[
        ComputeNorm(),
        CheckLoss(),
        ModelEvalMetrics(),
    ],
    loggers=[
        ProgessLogger(),
        TensorBoardLogger(),
    ],
)
trainer.fit(
    train_dataloader=cstorch.utils.data.DataLoader(
        registry.get_data_processor("GptHDF5MapDataProcessor"),
        data_dir="/data/llama_v3_dataset_vocab128256/train",
        batch_size=80,
        shuffle=False,
        shuffle_seed=1337,
        num_workers=8,
        prefetch_factor=10,
        persistent_workers=True, # Important to avoid seeding at each epoch
    ),
    val_dataloader=[
        cstorch.utils.data.DataLoader(
            registry.get_data_processor("GptHDF5MapDataProcessor"),
            data_dir="/data/llama_v3_dataset_vocab128256/val",
            batch_size=80,
            shuffle=False,
            shuffle_seed=1337,
            num_workers=8,
            prefetch_factor=10,
            persistent_workers=True, # Important to avoid seeding at each epoch
        ),
    ]
)
Start Pre-Training#
Now that you have a fully configured Trainer, all there is to do now is to kick off the run and start pre-training.
Let’s assume that the YAML configuration that you put together above is
written to a file called ./pretrain_llama_8b.yaml.
Then, to run pre-training using the training script that comes packaged as part of ModelZoo, you can run the following on the command line
python modelzoo/models/nlp/llama/run.py CSX \
    --mode train_and_eval \
    --params ./pretrain_llama_8b.yaml \
Let’s assume that the python code that you put together above is
written to a file called ./pretrain_llama_8b.py.
Then, to run pre-training, all there is to do is to execute that python script.
python ./pretrain_llama_8b.py
Monitor the Run#
Once compilation finishes and the Wafer-Scale Cluster is programmed for execution, you should start seeing progress logs that look like
| Train Device=CSX, Step=1, Loss=1.39258, Rate=16.30 samples/sec, GlobalRate=16.30 samples/sec
| Train Device=CSX, Step=2, Loss=1.40430, Rate=20.40 samples/sec, GlobalRate=19.13 samples/sec
| Train Device=CSX, Step=3, Loss=1.38086, Rate=21.93 samples/sec, GlobalRate=20.25 samples/sec
| Train Device=CSX, Step=4, Loss=1.41211, Rate=22.45 samples/sec, GlobalRate=20.84 samples/sec
| Train Device=CSX, Step=5, Loss=1.35352, Rate=22.57 samples/sec, GlobalRate=21.17 samples/sec
| Train Device=CSX, Step=6, Loss=1.38477, Rate=22.54 samples/sec, GlobalRate=21.39 samples/sec
| Train Device=CSX, Step=7, Loss=1.39258, Rate=22.52 samples/sec, GlobalRate=21.54 samples/sec
| Train Device=CSX, Step=8, Loss=1.37695, Rate=22.44 samples/sec, GlobalRate=21.64 samples/sec
| Train Device=CSX, Step=9, Loss=1.40234, Rate=22.33 samples/sec, GlobalRate=21.71 samples/sec
| Train Device=CSX, Step=10, Loss=1.38281, Rate=22.38 samples/sec, GlobalRate=21.78 samples/sec
| Train Device=CSX, Step=11, Loss=1.39453, Rate=21.32 samples/sec, GlobalRate=21.67 samples/sec
| Train Device=CSX, Step=12, Loss=1.39844, Rate=21.72 samples/sec, GlobalRate=21.69 samples/sec
| Train Device=CSX, Step=13, Loss=1.38672, Rate=21.88 samples/sec, GlobalRate=21.71 samples/sec
| Train Device=CSX, Step=14, Loss=1.34961, Rate=21.91 samples/sec, GlobalRate=21.73 samples/sec
| Train Device=CSX, Step=15, Loss=1.33203, Rate=21.88 samples/sec, GlobalRate=21.74 samples/sec
| Train Device=CSX, Step=16, Loss=1.33008, Rate=21.91 samples/sec, GlobalRate=21.75 samples/sec
| Train Device=CSX, Step=17, Loss=1.33984, Rate=21.88 samples/sec, GlobalRate=21.76 samples/sec
| Train Device=CSX, Step=18, Loss=1.31250, Rate=21.88 samples/sec, GlobalRate=21.76 samples/sec
| Train Device=CSX, Step=19, Loss=1.36133, Rate=21.91 samples/sec, GlobalRate=21.77 samples/sec
| Train Device=CSX, Step=20, Loss=1.30664, Rate=23.15 samples/sec, GlobalRate=21.87 samples/sec
| Train Device=CSX, Step=21, Loss=1.30078, Rate=22.52 samples/sec, GlobalRate=21.88 samples/sec
| Train Device=CSX, Step=22, Loss=1.31250, Rate=22.23 samples/sec, GlobalRate=21.89 samples/sec
| Train Device=CSX, Step=23, Loss=1.30664, Rate=21.10 samples/sec, GlobalRate=21.82 samples/sec
| Train Device=CSX, Step=24, Loss=1.30469, Rate=22.73 samples/sec, GlobalRate=21.90 samples/sec
| Train Device=CSX, Step=25, Loss=1.28906, Rate=21.42 samples/sec, GlobalRate=21.84 samples/sec
...
| Eval Device=CSX, GlobalStep=1000, Batch=1, Loss=1.21875, Rate=21.47 samples/sec, GlobalRates=21.66 samples/sec
| Eval Device=CSX, GlobalStep=1000, Batch=2, Loss=1.24219, Rate=22.65 samples/sec, GlobalRates=21.66 samples/sec
| Eval Device=CSX, GlobalStep=1000, Batch=3, Loss=1.26562, Rate=22.06 samples/sec, GlobalRates=21.66 samples/sec
| Eval Device=CSX, GlobalStep=1000, Batch=4, Loss=1.25195, Rate=21.90 samples/sec, GlobalRates=21.66 samples/sec
| Eval Device=CSX, GlobalStep=1000, Batch=5, Loss=1.27539, Rate=21.80 samples/sec, GlobalRates=21.66 samples/sec
| Eval Device=CSX, GlobalStep=1000, Batch=6, Loss=1.23047, Rate=21.79 samples/sec, GlobalRates=21.66 samples/sec
| Eval Device=CSX, GlobalStep=1000, Batch=7, Loss=1.22852, Rate=20.72 samples/sec, GlobalRates=21.66 samples/sec
| Eval Device=CSX, GlobalStep=1000, Batch=8, Loss=1.27734, Rate=21.24 samples/sec, GlobalRates=21.66 samples/sec
| Eval Device=CSX, GlobalStep=1000, Batch=9, Loss=1.23633, Rate=22.57 samples/sec, GlobalRates=21.66 samples/sec
| Eval Device=CSX, GlobalStep=1000, Batch=10, Loss=1.27930, Rate=22.10 samples/sec, GlobalRates=21.66 samples/sec
| Eval Device=CSX, GlobalStep=1000, Batch=11, Loss=1.23438, Rate=20.86 samples/sec, GlobalRates=21.66 samples/sec
| Eval Device=CSX, GlobalStep=1000, Batch=12, Loss=1.24609, Rate=21.31 samples/sec, GlobalRates=21.66 samples/sec
| Eval Device=CSX, GlobalStep=1000, Batch=13, Loss=1.23633, Rate=21.47 samples/sec, GlobalRates=21.66 samples/sec
| Eval Device=CSX, GlobalStep=1000, Batch=14, Loss=1.23633, Rate=21.48 samples/sec, GlobalRates=21.66 samples/sec
| Eval Device=CSX, GlobalStep=1000, Batch=15, Loss=1.21680, Rate=22.66 samples/sec, GlobalRates=21.66 samples/sec
...
Note
The performance numbers that you get will vary depending on how many Cerebras systems you are using and which generation systems you are using.
If you open up the TensorBoard you can more closely monitor the run be observing the trends in the graphs of the various logged metrics.
tensorboard --bind_all --logdir="./model_dir"
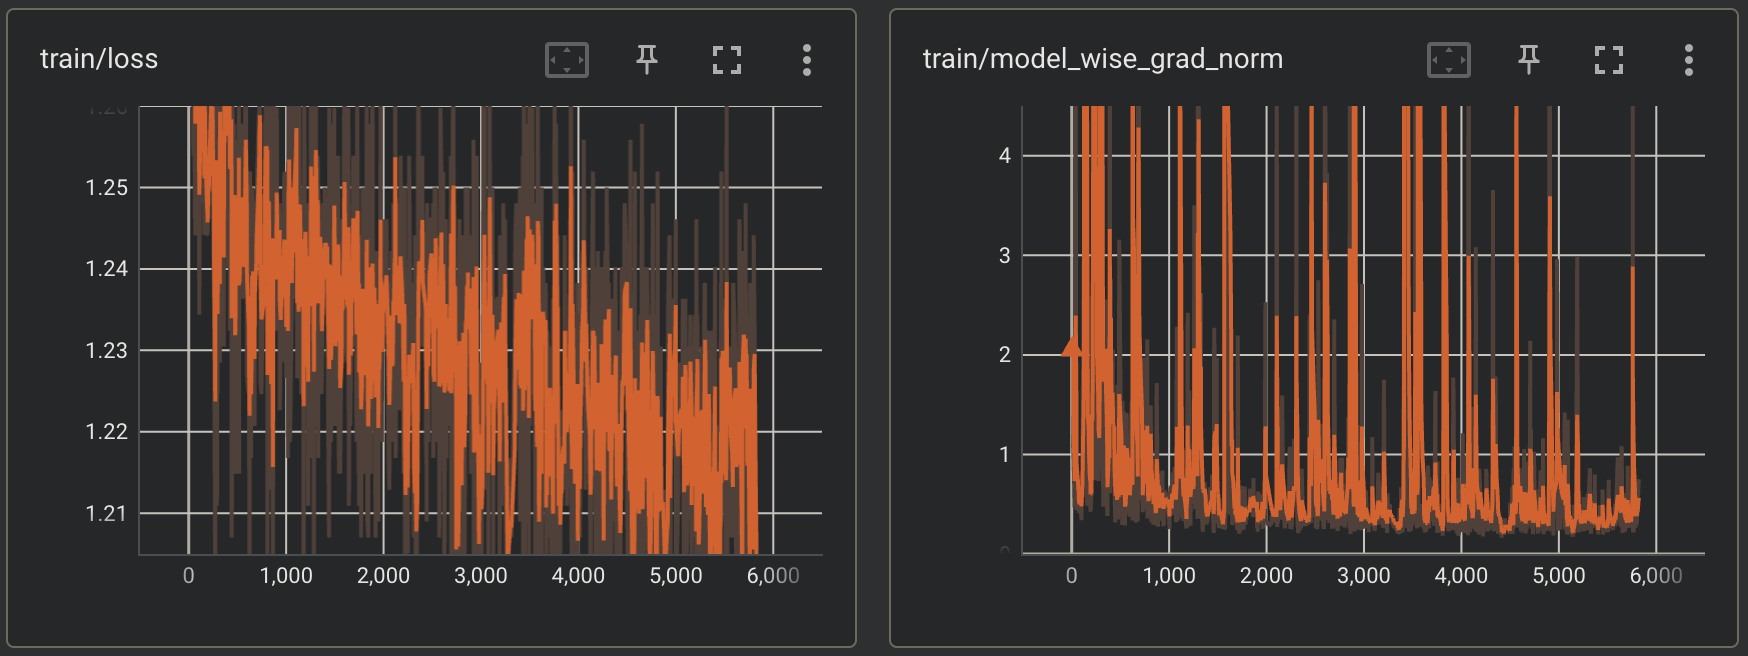
As can be seen above, the screenshots were taken at around step 5800. At this point you can observe that so far, the run seems to progressing well. The losses appear to be trending downwards and the model wise gradient norms don’t appear overly abnormal.
Porting the Model to Hugging Face#
Once the pre-training run has finished, you can port the model and checkpoint to Hugging Face.
To learn more about how to do this, see Port a trained and fine-tuned model to Hugging Face.
Conclusion#
With that, you have completed your first pre-training run with validation on the Cerebras Wafer-Scale Cluster using the ModelZoo Trainer!
By now, you should understand how to write your own Trainer configuration and how to kick off a training job on the Cerebras Wafer-Scale Cluster. You can now take this knowledge and pre-train your very own model.