Training a UNet for large image segmentation#
Estimated time: 2 to 3 hours
Overview#
This tutorial teaches you how to train a UNet-28 model on high-resolution images from the Inria-Aerial Image Labeling dataset. The Inria-Aerial dataset comprises 300 high-resolution color aerial images of various geographical locations ranging from densely populated areas to alpine towns, created with the aim of the automatic pixel-wise labeling of aerial imagery.
Prerequisites#
At this point you have access to the user node in the Cerebras Wafer-Scale Cluster. Contact your sys admin if you face any issues in the system configuration.
Set up Cerebras Model Zoo#
For simplicity, let’s create a parent directory, to include all the data, code, and checkpoints and call it unet_tutorial. Export an environment variable PARENT_CS with the full path to the parent directory. This environment variable will be helpful when pointing to the absolute path during the execution.
mkdir unet_tutorial
cd unet_tutorial
export PARENT_CS=$(pwd)
Inside the unet_tutorial folder, let’s clone Cerebras Model Zoo, a repository with reference models and tools to run on Cerebras cluster. For more information visit modelzoo.
git clone https://github.com/Cerebras/modelzoo.git
Output
Cloning into 'modelzoo'...
remote: Enumerating objects: 1690, done.
remote: Counting objects: 100% (163/163), done.
remote: Compressing objects: 100% (79/79), done.
remote: Total 1690 (delta 105), reused 85 (delta 84), pack-reused 1527
Receiving objects: 100% (1690/1690), 21.58 MiB | 27.35 MiB/s, done.
Resolving deltas: 100% (942/942), done.
After this step, you will have a folder called modelzoo inside the unet_tutorial parent directory.
At this point you should have a folder called modelzoo inside the unet_tutorial parent directory.
Set up Cerebras Python virtual environment#
1. Create a Python virtual environment with Cerebras’s software dependencies. You can find more information in Set up a Cerebras virtual environment. You will create your virtual environment in the parent directory demo. The environment variable PARENT_CS contains the full path.
cd $PARENT_CS
/opt/python3.8/bin/python3.8 -m venv venv_cerebras_pt
source venv_cerebras_pt/bin/activate
Note that now you should be in the (venv_cerebras_pt) environment.
pip install --upgrade pip
2. Install Cerebras’s Model Zoo dependencies. For more information, refer how to modelzoo.
pip install -r requirements.txt --extra-index-url https://download.pytorch.org/whl/cpu
Output
Collecting ...
Downloading ...
Installing collected packages: ...
Prepare the Inria Aerial Image Labeling dataset#
Download and unzip the data#
Download the dataset from here. Once you create an account, you’ll see the instruction for downloading and unzipping the data. Please follow their instructions. The data files are in TIFF format for images and ground truth labels. The folder structure should look like the following:
inria_aerial
|
├── test
│   ├── images
│   │   ├── bellingham10.tif
│   │   ├── bellingham11.tif
│   │   ├── ...
├── train
│   ├── gt
│   │   ├── austin11.tif
│   │   ├── austin12.tif
│   │   ├── ...
Create a validation set#
Let’s set aside a portion of the training set to validate the model after training. We can do so by running the commands below from the “inria_aerial “directory. Alternatively, you can paste the commands in the shell script for more convenience.
mkdir val
mkdir val/images
mkdir val/gt
mv train/images/austin[34, 19, 10].tif val/images/
mv train/images/chicago[6, 22, 18].tif val/images/
mv train/images/kitsap[18, 4, 26].tif val/images/
mv train/images/tyrol[19, 26, 22].tif val/images/
mv train/images/vienna[1, 23, 18].tif val/images/
mv train/gt/austin[34, 19, 10].tif val/gt/
mv train/gt/chicago[6, 22, 18].tif val/gt/
mv train/gt/kitsap[18, 4, 26].tif val/gt/
mv train/gt/tyrol[19, 26, 22].tif val/gt/
mv train/gt/vienna[1, 23, 18].tif val/gt/
The data directory structure should look as follows:
inria_aerial
│
├── test
│   ├── images
│   │   ├── bellingham10.tif
│   │   ├── ...
├── train
│   ├── gt
│   │   ├── austin11.tif
│   │   ├── ...
│   ├── images
│   │   ├── austin11.tif
│   │   ├── ...
├── val
│   ├── gt
│   │   ├── austin10.tif
│   │   ├── ...
│   ├── image
│   │   ├── austin10.tif
│   │   ├── ...
Resize the images#
The resolution of the images in this dataset is 5000x5000, however:
Using image shapes with more powers of 2 yields the best performance on CS systems
The shape of the input (height and width) passed to the model should be such that the output feature maps from Encoder blocks are divisible by 2.
Therefore, use a preprocessing script to create a resized dataset. In this case, scale the images up to 5120x5120. To do so, you will use the resize_inria_files.py script that is available in Cerebras’s Model Zoo:
python $PARENT_CS/modelzoo/vision/pytorch/unet/input/scripts/resize_inria_files.py \
     --input_dir $PARENT_CS/inria_aerial \
     --output_dir $PARENT_CS/inria_aerial_5120x5120 \
     --width 5120 \
     --height 5120 \
     --transform resize
The output directory will have the same structure as the input directory but will contain the resized images.
Train UNet#
Configure your run#
At this point, you need to configure your run. In the Model Zoo, each run is configured using a YAML file found in the configs subdirectory of the model. For UNet, the config files are located at $PARENT_CS/modelzoo/vision/pytorch/unet/configs/
It is good practice to create a new YAML config file for each run (as opposed to editing an older config file). We already have a config file for Inria dataset training called params_inria_aerial_5120_RGB.yaml.
Create a copy of the YAML file and name it params_inria_aerial_5120_RGB_tutorial.yaml.
Set the path to the data; this is the path the data loaders use to read the data. It is set in train_input.data_dir as follows:
train_input: &train_input
    data_processor: InriaAerialDataProcessor
    data_dir: "[absolute path to inria_aerial_5120x5120 directory]"
    …
To have a quick run, you can reduce the runcofig.max_steps to 100.
Launch the run#
Hint
Launching your run from a screen or tmux terminal is a good idea. This way, your run will continue even if you get disconnected. Just remember to activate the Python virtual environment again inside the new terminal.
To launch your training job, navigate to $PARENT_CS/modelzoo/vision/pytorch/unet/ and run:
python run.py CSX \
    --num_csx=1 \
    --mode train \
    --params configs/params_inria_aerial_5120_RGB_tutorial.yaml \
    --model_dir unet_tutorial_model_dir \
    --mount_dirs $PARENT_CS \
    --python_paths $PARENT_CS
Running this script submits a job to the cluster queue. Once the resources are available, the clusters start comiling and then run your job. You’ll see the latest status of the job in the terminal.
2023-06-15 16:13:31,708 INFO:   Constructing UNetModel (parameter initialization)
2023-06-15 16:13:32,719 INFO:   No checkpoint was provided, using randomly initialized model parameters.
2023-06-15 16:13:42,866 INFO:   Saving checkpoint at global step 0
2023-06-15 16:14:06,805 INFO:   Compiling the model. This may take a few minutes.
2023-06-15 16:14:08,628 INFO:   Initiating a new image build job against the cluster server.
2023-06-15 16:14:08,652 INFO:   image_build job id: imgjob-22f0444171ab384ed3c7cc85c33c1218, log path: /cb/tests/cluster-mgmt/mb-systemf58/workdir/imgjob-22f0444171ab384ed3c7cc85c33c1218
2023-06-15 16:14:09,034 INFO:   Initiating a new compile wsjob against the cluster server.
2023-06-15 16:14:09,048 INFO:   compile job id: wsjob-ehjhgfocd6a5uecjjfcrma, log path: /cb/tests/cluster-mgmt/mb-systemf58/workdir/wsjob-ehjhgfocd6a5uecjjfcrma
2023-06-15 16:14:19,058 INFO:   Poll ingress status: Waiting for job running, current job status: Queueing, msg: job queueing, waiting for lock grant. Cluster status: 1 compile job(s) queued before current job
2023-06-15 16:18:19,174 INFO:   Poll ingress status: Waiting for coordinator to be ready.
2023-06-15 16:18:49,200 INFO:   Ingress is ready.
2023-06-15 16:18:51,112 INFO:   Pre-optimization transforms...
2023-06-15 16:18:51,359 INFO:   Optimizing layouts and memory usage...
Exploring floorplans:  100%|████████████████████████████████████████████████████████████████████████████████████████| 00:02
Exploring data layouts:  100%|██████████████████████████████████████████████████████████████████████████████████████| 15:47
Optimizing memory usage:  100%|█████████████████████████████████████████████████████████████████████████████████████| 00:02
2023-06-15 16:35:05,842 INFO:   Post-layout optimizations...
2023-06-15 16:35:06,411 INFO:   Allocating buffers...
2023-06-15 16:35:07,032 INFO:   Code generation...
2023-06-15 16:35:13,993 INFO:   Compiling image...
Compiling kernels:  100%|███████████████████████████████████████████████████████████████████████████████████████████| 03:44
Compiling final image:  100%|███████████████████████████████████████████████████████████████████████████████████████| 05:05
2023-06-15 16:46:23,448 INFO:   Compile successfully written to cache directory: cs_8908697786563249205
2023-06-15 16:46:23,476 INFO:   Compile for training completed successfully!
2023-06-15 16:46:23,786 INFO:   User venv cluster volume: {'meta': {'labels': {'allow-venv': 'true', 'cerebras-internal': 'true'}, 'name': 'user-venv-volume', 'type': 'volume'}, 'nfs': {'containerPath': '/cb/tests/cluster-mgmt/user-venv', 'readonly': False, 'server': '10.253.56.8', 'serverPath': '/tests/cluster-mgmt/user-venv'}}
2023-06-15 16:46:23,787 INFO:   Copying the user environment
2023-06-15 16:54:59,592 INFO:   Initiating a new execute wsjob against the cluster server.
2023-06-15 16:54:59,624 INFO:   execute job id: wsjob-nnivhtibzuz5ucexapwfhd, log path: /cb/tests/cluster-mgmt/mb-systemf58/workdir/wsjob-nnivhtibzuz5ucexapwfhd
2023-06-15 16:55:09,636 INFO:   Poll ingress status: Waiting for coordinator to be ready.
2023-06-15 16:56:09,695 INFO:   Ingress is ready.
2023-06-15 16:56:09,716 INFO:   Preparing to execute using 1 CSX
2023-06-15 16:56:09,729 INFO:   Monitoring Coordinator for Runtime server errors
2023-06-15 16:56:29,962 INFO:   About to send initial weights
Transferring weights to server: 100%|███████████████████████████████████████████████████████████████████████████████| 501/501 [00:12<00:00, 40.33tensors/s]
2023-06-15 16:56:42,569 INFO:   Finished sending initial weights
2023-06-15 16:56:42,573 INFO:   Finalizing appliance staging for the run
2023-06-15 17:01:59,315 INFO:   Finished staging the appliance
2023-06-15 17:01:59,321 INFO:   Beginning appliance run
2023-06-15 17:36:38,522 INFO:   | Train Device=CSX, Step=1, Loss=0.56250, Rate=199.11 samples/sec, GlobalRate=198.26 samples/sec
2023-06-15 17:36:38,527 INFO:   | Train Device=CSX, Step=2, Loss=0.54297, Rate=214.10 samples/sec, GlobalRate=210.72 samples/sec
2023-06-15 17:36:38,530 INFO:   | Train Device=CSX, Step=3, Loss=0.50781, Rate=258.38 samples/sec, GlobalRate=231.40 samples/sec
2023-06-15 17:36:38,533 INFO:   | Train Device=CSX, Step=4, Loss=0.77734, Rate=321.99 samples/sec, GlobalRate=254.64 samples/sec
2023-06-15 17:36:38,536 INFO:   | Train Device=CSX, Step=5, Loss=0.71875, Rate=323.02 samples/sec, GlobalRate=265.99 samples/sec
2023-06-15 17:36:38,539 INFO:   | Train Device=CSX, Step=6, Loss=0.70703, Rate=344.73 samples/sec, GlobalRate=278.02 samples/sec
...
2023-06-15 17:37:11,053 INFO:   | Train Device=CSX, Step=100, Loss=0.67188, Rate=375.10 samples/sec, GlobalRate=376.07 samples/sec
2023-06-15 17:37:11,054 INFO:   Saving checkpoint at global step 100
Transferring weights from server: 100%|█████████████████████████████████████████████████████████████████████████████| 656/656 [00:13<00:00, 48.57tensors/s]
2023-06-15 17:37:25,108 INFO:   Saved checkpoint at global step: 100
2023-06-15 17:37:25,109 INFO:   Training completed successfully!
2023-06-15 17:37:37,892 INFO:   Cleaning up user environment copy
Once your training is complete, inside your demo folder you will find:
unet_tutorial_model_dir/
├── cerebras_logs
├── checkpoint_0.mdl
├── checkpoint_100.mdl
├── ckpt_info
├── initial_state_XXX.XXX.hdf5
├── initial_state_XXX.XXX.hdf5.data
├── performance
├── run_XXX_XXX.log
└── train
    ├── events.out.tfevents.XXX.XXX
    └── params_train.yaml
Note here that the checkpoint_0.mdl and checkpoint_100.mdl are the initial and the final checkpoints.
Furthermore, inside the train directory, you will find:
events.out.tfevents.XXX.XXX: Tensorboard events log that is used by Tensorboard to visualize loss and other metrics of interestparams_train.yaml: includes all the default and user specified configuration for this run
Evaluate you model#
Specify the desired checkpoint path to evaluate your model and set --mode eval.
If you specify the same --model_dir as the training run but not set the``–checkpoint_path``, it will pickup the last checkpoint from that training run.
Once your eval job starts, you will see the following in the terminal. When the job ends, it will print out the eval metrics.
2023-06-19 18:45:18,533 INFO:   Constructing UNetModel (parameter initialization)
2023-06-19 18:45:19,495 INFO:   Found latest checkpoint at unet_tutorial_model_dir/checkpoint_100.mdl.This checkpoint will be used for loading model state.
...
2023-06-19 19:09:26,640 INFO:   Avg eval_metrics = {'eval/accuracy': 0.84765625, 'eval/mean_iou': 0.408203125, 'eval/dice_coefficient': 0.455078125}
2023-06-19 19:09:26,640 INFO:   Avg Eval Loss: 0.49296875
2023-06-19 19:09:28,082 INFO:   Monitoring returned
Example results#
The following figure compares a predicted segmentation mask with the ground truth for an image in your validation set after training the model for 10,000 steps.
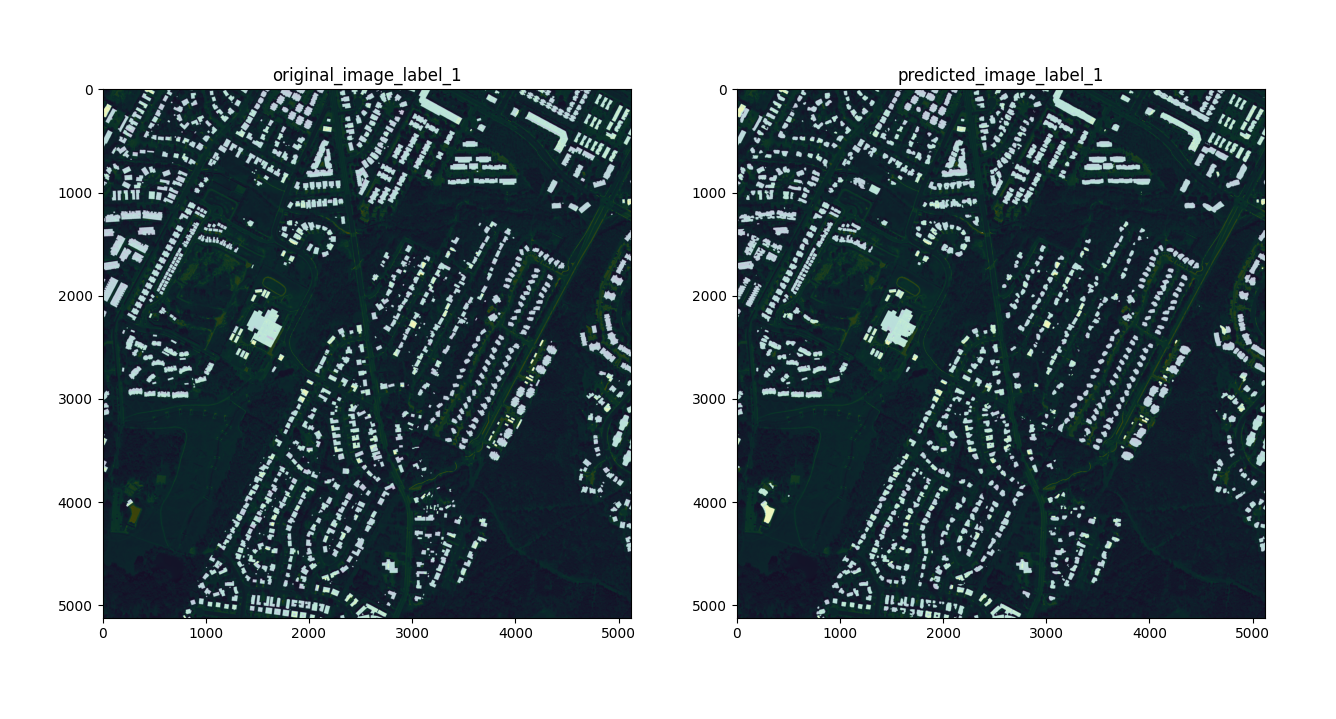
Fig. 9 Sample Results from Inria-Aerial dataset on image austin19.tif#