Model Zoo config classes#
Overview#
When using the Cerebras Model Zoo, working with model parameters and configurations is a common and important task. To make it easy for users to define, manage, and validate model configurations, Model Zoo uses Config classes.
Config classes are built on Python’s dataclass framework and offer a robust and structured approach to managing model configurations. These classes act as detailed “schemas” that not only store essential model settings but also enforce data type and value constraints, providing a much-needed layer of validation.
Furthermore, Config classes empower programmers to manage and tweak settings for each model without the need for complex code alterations. This approach fosters a more structured and adaptable environment for experimentation and fine-tuning.
Key Advantages of Config classes:
Validation: By defining expected data types and constraints, Config classes significantly reduce the risk of common errors such as typos, incorrect data types, or missing fields, ensuring that configurations are consistent and reliable.
Improved Documentation: With the structured nature of Config classes, documentation will be automatically generated from docstrings that are present in the class, ensuring better alignment between what’s documented and the actual code.
Enhanced Manageability: As models evolve to become more sophisticated, Config classes provide a clear and organized way to manage configuration parameters within the Python code, simplifying navigation and modifications, thus reducing duplication, potential confusion and errors in comparison to YAML files.
Config classes represent a leap forward in how we define, manage, and validate model configurations, streamlining the development process and enabling more efficient and error-resistant model training on the WSC.
Config class hierarchy#
Within the modelzoo/config_manager/base directory, you’ll find a series of “base” Config classes that serve as foundational elements for inheritance. The organizational structure of these classes is strategically designed to enhance manageability. These “base” Config classes encapsulate common parameters across different models, facilitating an extensible framework where model-specific Config classes are built upon these foundational elements.
The inheritance structure is illustrated as follows:
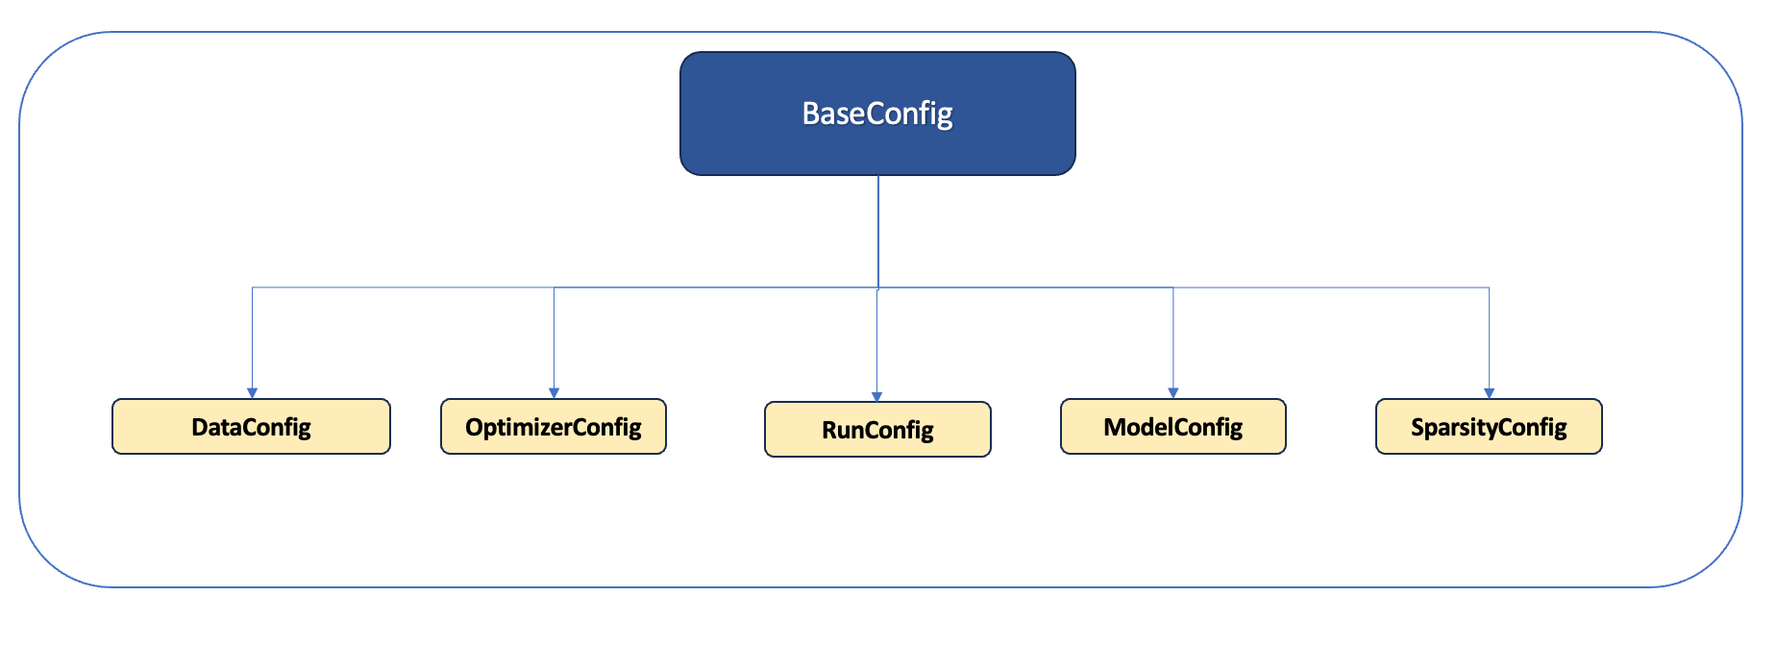
Fig. 11 Cerebras Model Zoo inheritance structure#
Base config#
The hierarchy begins with the Base Config, which contains validation logic and acts as the cornerstone for other Config classes.
The derivatives of Base Config fall into two main categories:
Model Agnostic Classes:
This category includes DataConfig, OptimizerConfig, RunConfig, and SparsityConfig, which are general classes applicable across various models.
Model Specific Classes:
The ModelConfig serves as a generic model class, encompassing parameters shared by all models. It’s primarily designed as a superclass for model-specific subclasses tailored to individual models. These subclasses inherit from ModelConfig, enabling the addition of unique model parameters.
These classes reflect sections and values found in a YAML configuration file, streamlining the transition from YAML to a more structured approach.
For instance, when introducing model-specific parameters, these are derived from ModelConfig, illustrating the extendable nature of the hierarchy:
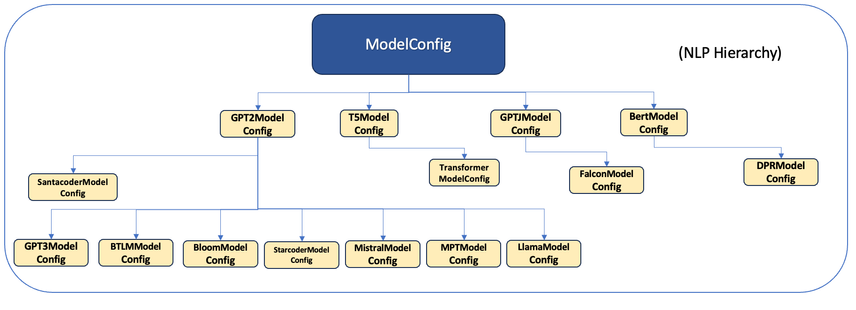
Fig. 12 NLP model Config class#
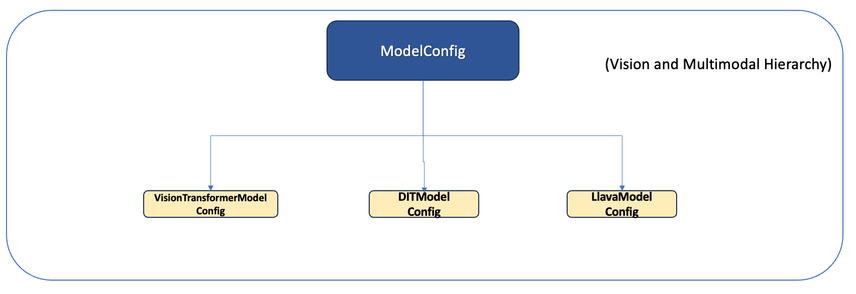
Fig. 13 Vision model Config class#
For users aiming to develop a variant model, the process involves extending ModelConfig with their model-specific parameters, further detailed in the subsequent section. This modular approach ensures that new models can be seamlessly integrated into the Model Zoo with robust parameter management and validation.
Config class usage scenarios#
This section outlines various scenarios where Config classes are utilized, highlighting the impact on user experience following their implementation.
Using an existing model from the Model Zoo#
The user experience remains unchanged when running an existing model. For each model, we provide the necessary model-specific Config classes (found within config.py in <model-name>/) as part of our release. Users can execute their training runs as they have done previously. For example, running a model would typically use the following command:
<path_to_model>/run.py --params <path_to_model_config>/sample_config.yaml
Model-specific YAML files are located in the <model-name>/configs/mz/ folder. Users can edit these files directly to alter parameter values.
Note that the validation against the Config classes occurs behind the scenes, ensuring a seamless transition for the user.
For example:
Let’s consider a snippet of config.py for GPT2 – in particular, the section which defines the model parameters i.e GPT2ModelConfig. Its configuration will be reflected in a YAML file, which, when executed, is validated by the Config class based on the schema defined in config.py (located at: modelzoo/models/nlp/gpt2/config.py).
The model parameters in the YAML might look like this:
model:
  vocab_size: 50257
  hidden_size: 768
  share_embedding_weights: True
  num_heads: 12
  position_embedding_type: "learned"
The corresponding section in the config.py would look like this:
class GPT2ModelConfig(ModelConfig):

  # Embedding:
  vocab_size: int = required
  "The size of the vocabulary used in the model. Max supported value: 512000."

  hidden_size: int = 768
  "The size of the transformer hidden layers."

  share_embedding_weights: bool = True
  "Whether to share the embedding weights between the input and out put embedding."

  num_heads: int = 12
  "The number of attention heads."

  position_embedding_type: Optional[
      Literal["learned", "fixed", "relative", "rotary", "alibi"]
  ] = "learned"

  # and more such parameters...
For instance:
If config.py stipulates that
num_headsmust be an integer, any deviation in data type will trigger an error.Typos or incorrect parameter names (e.g., using
number_hidden_layersinstead ofnum_hidden_layers) are identified through the Config class’s validation logic.
In essence, Config classes enhance the robustness of the configuration process, ensuring that parameters adhere to predefined schemas and reducing the likelihood of errors during model setup and execution.
Creating a variant of a supported model#
If a user wishes to modify an existing model or develop a new variant (for instance, creating DistilBERT from BERT), they will likely introduce new parameters. The validation of these parameters is handled through Config classes, so the user must create a new config.py file for their model variant.
To create a new model variant:
1. Customize config.py: The user should create a config.py in the model/ directory of the specific model, defining the model-specific Config classes for validation. For instance, if the model is T5, the configuration file would be located at: modelzoo/models/nlp/t5/config.py.
(Note: Our class naming convention follows the pattern: <ModelName>+<ConfigClass>. For example, the configuration class for GPT2 is “GPT2ModelConfig”, and for T5, it’s “T5ModelConfig”.)
2. Determine the Model Family: Users should identify the family or the base model their variant is derived from to inherit the correct Config classes. By understanding the model hierarchy, users can ensure they inherit from the appropriate base class, adding any new parameters necessary for their variant.
For example, if GPT3 is a variant of GPT2, then “GPT3ModelConfig” would inherit from “GPT2ModelConfig” rather than directly from ModelConfig.
In defining the model’s configuration, two main classes need to be specified:
Main Config class: This class, named
<ModelName>Config, initializes various sections likeeval_input,model,optimizer, etc.Model-Specific Config class: The class
<ModelName>ModelConfigoutlines the specific parameters required by the model variant.
[Note: It’s generally expected that modifications will focus on extending the ModelConfig class to include specific parameters for the new model variant. Should there be a need to alter any model-agnostic classes such as RunConfig, DataConfig, SparsityConfig, or OptimizerConfig, users are encouraged to reach out to Cerebras support for guidance.]
Creating a new model configuration#
To illustrate the process of creating a new model configuration, let’s consider developing TinyBERT, a simplified version of the BERT model. Here’s how the config.py for TinyBERT would be structured:
1. Defining the Main Config class
The main configuration class, TinyBERTConfig, is defined by extending “BertConfig”. We use a decorator to register this configuration class, which allows the system to recognize and utilize TinyBERT’s specific configurations.
@dataclass
@register_config("TinyBERT")  # Registration API to recognize the new config class
class TinyBERTConfig(BertConfig):
  """
  Documentation for class members can be added here.
  """
  eval_input: Optional[DataConfig] = None
  model: TinyBERTModelConfig = required
  optimizer: OptimizerConfig = required
  runconfig: RunConfig = required
  train_input: Optional[DataConfig] = None
  sparsity: Optional[SparsityConfig] = None
“TinyBERTConfig” inherits from “BertConfig” and includes additional parameters necessary for the TinyBERT model.
2. Defining the Model-Specific Config class
Next, we define “TinyBERTModelConfig”, which is specific to the TinyBERT model. Let’s hypothetically assume TinyBERT differs from BERT by having a unique num_layers parameter. This distinction is reflected in the configuration class as follows:
@dataclass
class TinyBERTModelConfig(BertModelConfig):
  """
  Model-specific configuration for TinyBERT.
  """
  num_layers: int = 1024  # Example: assuming BERT has 4096 layers and TinyBERT has 1024
In this “TinyBERTModelConfig”, we specify the num_layers parameter, showcasing how to represent a model-specific attribute within the configuration. Similarly, any other parameter modifications or additions for TinyBERT should be defined within this or corresponding specific Config classes.
Adding custom validation logic#
To incorporate custom validation or conditional logic within your Config class, you can define a __post_init__ method in your dataclass. This method is automatically invoked after the dataclass is initialized, allowing you to apply additional checks or set up conditions based on the initialized parameters.
Here’s how you might implement this in your “TinyBERTConfig” class to add custom logic that sets use_bias_in_output based on dropout_rate:
from dataclasses import dataclass, field, InitVar
from typing import Optional

@dataclass
@register_config("TinyBERT")
class TinyBERTConfig(BertConfig):
  """
  Configuration class for TinyBERT with custom validation logic.
  """
  eval_input: Optional[DataConfig] = None
  model: TinyBERTModelConfig = required
  optimizer: OptimizerConfig = required
  runconfig: RunConfig = required
  train_input: Optional[DataConfig] = None
  sparsity: Optional[SparsityConfig] = None

  # Additional attributes for demonstration
  dropout_rate: float = 0.0  # Hypothetical parameter
  use_bias_in_output: bool = False  # Another hypothetical parameter

  def __post_init__(self):
      """
      Custom validation logic after initialization.
      """
      # Implementing conditional logic based on dropout_rate
      if self.dropout_rate == 0.1:
          self.use_bias_in_output = True
In this example, after the “TinyBERTConfig” class is initialized, the __post_init__ method checks if dropout_rate is set to 0.1. If so, it automatically sets use_bias_in_output to “True”. This method can be extended with more complex logic, enabling dynamic adjustments and validations based on the configuration parameters provided during initialization.
Adding custom constraint logic#
To add custom constraint logic to Config classes, users can define their own validation functions and apply them to specific parameters. This flexibility allows for more granular control over the configuration parameters. Here’s how to implement a custom constraint that ensures a parameter is always a negative integer:
1. Define the Constraint Function
Create a new function in config_validators.py to define the custom constraint. This file is located at modelzoo/config_manager/config_validators.py.
def check_negative_integer(value):
  """Check if the parameter is a negative integer."""
  return isinstance(value, int) and value < 0

# Alias for ease of import in config.py
NegativeInteger = check_negative_integer
2. Apply the Constraint in config.py
Use the newly defined constraint in config.py by applying it to a config_field. The config_field method, found in base_config.py, allows you to specify constraints for configuration fields.
Assuming there’s a parameter named test that should always be negative, you can define it with the custom constraint as follows:
# Custom constraint logic imports.
from cerebras.modelzoo.config_manager.config_validators import NegativeInteger
from cerebras.modelzoo.config_manager.config_classes.base.base_config import config_field

@dataclass
class TinyBERTModelConfig(BertModelConfig):
  num_layers: int = 1024  # Hypothetical parameter, assuming BERT has 4096 layers.
  test: int = config_field(default=-1, constraint=NegativeInteger)  # Applying the custom constraint.

@dataclass
@register_config("TinyBERT")
class TinyBERTConfig(BertConfig):
  """
  Configuration class for TinyBERT with a custom constraint on a parameter.
  """
  eval_input: Optional[DataConfig] = None
  model: TinyBERTModelConfig = required
  optimizer: OptimizerConfig = required
  runconfig: RunConfig = required
  train_input: Optional[DataConfig] = None
  sparsity: Optional[SparsityConfig] = None
In this setup, the test parameter in “TinyBERTModelConfig” must be a negative integer, enforced by the NegativeInteger constraint. When an instance of “TinyBERTConfig” is created, the framework checks that test adheres to this constraint, enhancing the robustness and reliability of the configuration process.
Adding a New Parameter Type to the Config#
To ensure the system recognizes new parameters added to a model’s configuration, you must update both the YAML file and the corresponding config.py file. If a new parameter is added to the YAML without updating config.py, the system’s validation process will fail to recognize this new parameter.
Here’s how to add a new parameter:
1. Update the YAML File
Insert the new parameter into the appropriate section (train_input, eval_input, model, optimizer, sparsity, or runconfig) in the model’s YAML configuration file.
2. Update the config.py File
Define the new parameter’s type and default value in the corresponding class within config.py. Ensure the definition aligns with Python’s dataclass syntax.
Adding a parameter to an existing class in config.py#
In some instances, a new parameter may need to be added to a section other than the model’s ModelConfig. In such cases, the user must create a new class that inherits from the appropriate existing Config class and then extend it to include the new parameter.
For example, let’s consider that GPT-2 requires a new hypothetical parameter named large_sequence_optimization within the optimizer section of its YAML configuration. This necessitates the creation of a new class, “GPT2OptimizerConfig”, in config.py, which should inherit from OptimizerConfig.
If “GPT2OptimizerConfig” does not previously exist, it needs to be defined, and the main GPT2Config class must be updated to use this new optimizer Config class.
Here’s how the modification looks:
Before:
@registry.register_config("gpt2")
@dataclass
class GPT2Config(BaseConfig):
  # other configurations...
  optimizer: OptimizerConfig = required
After:
class GPT2OptimizerConfig(OptimizerConfig):
  # Custom parameters are defined here.
  large_sequence_optimization: bool = True  # The new parameter with a default value.

@registry.register_config("gpt2")
@dataclass

class GPT2Config(BaseConfig):
  # other configurations...
  optimizer: GPT2OptimizerConfig = required  # Update to use the new custom optimizer config.
Pay attention to the registration decorator (@registry.register_config("gpt2")) above the main Config class. When naming the model (which also corresponds to the model directory name), ensure consistency. If the class isn’t registered, the configuration class backend will not apply validation for this Config class during runtime, bypassing the custom logic you’ve implemented. For more information, read Model Zoo Registry.
Creating a new independent model configuration#
If you’re developing a new model that doesn’t rely on existing model configurations, you can directly inherit from BaseConfig rather than a specific model’s Config class. This approach gives you a clean slate for defining the model’s configuration while maintaining the structure and validation features provided by the base configuration framework.
Follow the steps below:
1. Define the Model Config class
Create a new Config class for your model, inheriting directly from BaseConfig. This class will include all necessary sections such as eval_input, model, optimizer, runconfig, train_input, and sparsity.
2. Implement Custom Validation (Optional)
If your model requires custom validation logic, implement a __post_init__ method in your Config class.
Here’s an example for a hypothetical model named “Variant”:
@dataclass
class VariantConfig(BaseConfig):
  """
  Configuration class for the Variant model.
  """

  eval_input: Optional[DataConfig] = None
  model: VariantModelConfig = required  # Refers to the specific model config below
  optimizer: OptimizerConfig = required
  runconfig: RunConfig = required
  train_input: Optional[DataConfig] = None
  sparsity: Optional[SparsityConfig] = None

@dataclass
@register_config("variant_model")
class VariantModelConfig(BaseModelConfig):
  """
  Model-specific configuration for Variant.
  """
  optimization_type: str  # Custom parameter example
  optimization_level: int  # Another custom parameter example
  # Add other model-specific parameters as needed...
In this example:
VariantConfig serves as the main configuration class for the Variant model, encapsulating all necessary configuration sections.
VariantModelConfig is a model-specific Config class that inherits from BaseModelConfig. It includes custom parameters like
optimization_typeandoptimization_level, which are specific to the Variant model.The @register_config(“variant_model”) decorator is used to ensure that the Variant model’s Config class is recognized and utilized by the system.
By following this structure, you can create a tailored configuration setup for your new model, leveraging the robustness of the existing configuration framework while accommodating your model’s unique requirements.
What’s next?#
The Cerebras Model Zoo Registry serves as a centralized hub where users can find supported models, their paths, relevant datasets, and other dependencies. Learn more at the Model Zoo Registry.